OVERVIEW
Level: BEGINNER |
Using symbols and tweens in Flash allows us to speed up the process of animation. However, like any animation tool, it must be tempered with a strong, foundational understanding of great animation. Therefore in this tutorial, we’ll begin using the animation tools that Flash provides, specifically symbols and tweens, with an emphasis on using them in accordance with solid animation principles.

#006: How To Animate Using Flash Symbols And Tweens – Resource Files
£3.99WHAT ARE FLASH SYMBOLS AND TWEENS?
SYMBOLS
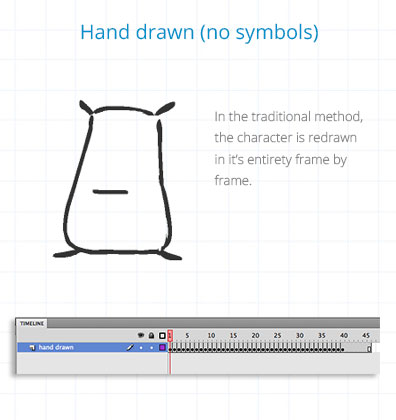
In Flash there are two popular ways to animate – hand drawn frame-by-frame or using Flash symbols. The hand drawn way is most akin to traditional 2D. It’s how many of the tutorials to date have been animated. It involves drawing all of the images required for the animation, frame for frame. Things like Simon’s Cat seem to be animated this way using Flash. It creates a rich, organic feeling to the animation.
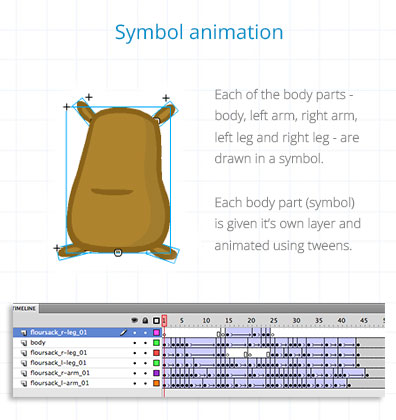
The other way is to use symbols. Using symbols is a bit like animating a puppet. Instead of hand drawing the character in its entirety every single frame, the constituent parts of the character – such as head, body, arms, hands, legs and feet etc – are all drawn once inside their own symbol. The symbol is a container for the original drawing. All the body parts are contained in their own symbol and the symbols are then arranged into sequences of poses and positions by adjusting their width, height, rotation and skew of the symbol. This is done by using the transform tool in Flash (Q).
Using symbols doesn’t preclude us animating frame by frame. Much the same as with a traditional approach, you can manually key all the inbetween positions by incrementally moving the symbol positions on each frame (like in stop motion). However, one of the benefits of using symbols is that we can get Flash to automatically add inbetween frames between key poses, significantly speeding up the process of animation. We do this by applying a tween.
TWEENS
There are a few different tweens in Flash. The tween which I am referring to is the Classic Tween. The tween automatically interpolates inbetween drawings between two keyframes. However, to create classic tweens, we are obliged to use the symbol method of animating.
WHY USE FLASH SYMBOLS AND TWEENS?
PROS
- Speed up the animation process as no need to redraw the body parts on each frame.
- Speeds up the animation production process as can duplicate all symbols and give to multiple animators to animate separate shots
- Helps to ensure the character stays on model as it’s the symbol being manipulated not the body parts being redrawn each frame – especially useful when shared between teams of animators.
- In games, symbols are required for the developers to manipulate the animation in code. Examples include run, jump, idle and attack animation loops in platform games etc. (However, development of games using Flash is becoming increasingly obsolete)
CONS
- Instead of simply animating, there is a learning curve required to understand and use symbols and tweens to animate.
- Often times, using programmatical inbetweens (tweens in flash but called by other names in various other animation programs) risks the animation looking floaty and poor. You must have a strong foundational animation knowledge to wrest the control of the animation from the computer and define exactly how you want it to work for you.
- Using symbols to animate in Flash risks looking very puppet-like, stiff and awkward.
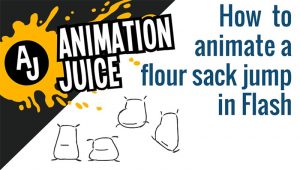
SETTING UP THE FLOUR SACK SYMBOLS
To begin animating using symbols, the best way to get started is to draw the first frame of the character directly on the stage, making sure to draw each body part on a separate layer. I’ll demonstrate setting up the flour sack body in this way below.
- Draw the body as depicted in Frame 1 (below) onto a new layer on the stage. Select it and then press F8 (or in the menu at the top click Insert > New Symbol)
- Give it an appropriate name (e.g. floursack_body_01)
- Change the type to be ‘Graphic’
- Press OK
Once created, double click to go inside the symbol. You’ll see that frame 1 has the first drawing (as below). Now we need to set up the other 3 frames. These 4 drawings are all we’ll use to create the entire flour sack jump. Draw them in the same place within the symbol but on successive frames:

In order to get the symbol to display the body in one of these 4 positions:
- Come out of the symbol and if you can’t see the symbol on the stage, drag an instance of it onto the stage from the library
- Select the symbol on the stage and in the Properties panel, make sure the symbol is set to ‘Single Frame’
- Type the frame number of the drawing you wish to display: frame 1, 2, 3 or 4. These correspond to the frame numbers of the images inside the ‘floursack_body_01’ symbol.
The arms and legs are set up in the exact same way as above. Like with the body, you could go into the arm and leg clips and add more images on successive frames. For example, adding arm drawings that have more curvature to them to be used in some of the overlapping action. In this case I chose not too as you don’t often get to add this level of refinement to your work in a production environment. However, by manipulating the symbol keyframes by rotating, skewing and adjusting the width and height using the symbol transform tool (Q) to follow nice paths of action (i.e. the principle of arcs), you can get nice smooth animation happening even with limited drawings.
After you’ve set up the character using symbols, the task is to arrange them into a sequence of key poses and add our inbetweens, just like we have outlined in the previous flour sack tutorial. You can watch the video or download the resource file for explicit directions on the key poses I used.
ADJUSTING THE SPACING OF TWEEN INBETWEENS
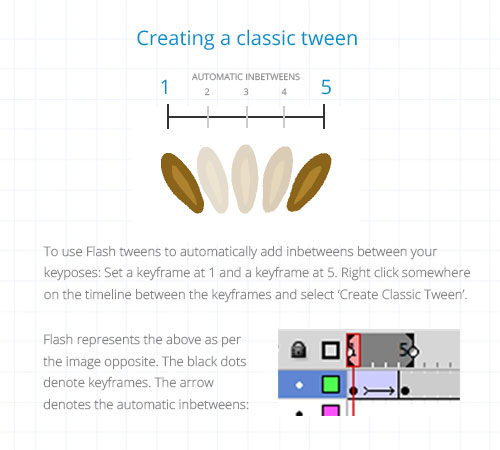
To add our inbetweens between our key poses symbols, we’re going to be using the classic tween feature of Flash. To apply the tween selectively between two keyframes, click somewhere on the timeline between two keyframes, right click and select Create Classic Tween. Alternatively, to add tweens to the whole animation, select all the keyframes, right click and select Create Classic Tween.
Either way, by default, the inbetweens that are created are evenly spaced between the keyframes. Remember though that adding evenly spaced inbetweens between our key poses, traditionally or programmatically, leads to boring, dull, lack-lustre animation. So the next thing to do is to sort out the spacing of the inbetweens Flash has given us.
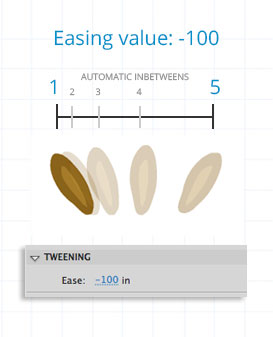
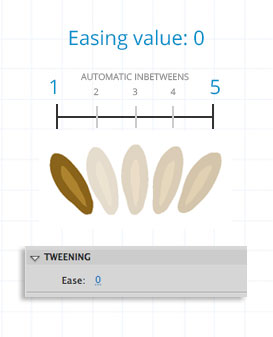
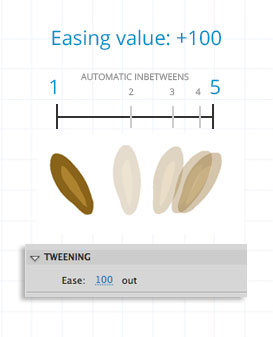
To do this with tweens, click on the tween you want to adjust the spacing of by clicking somewhere mid purple arrow. Then in the Properties panel, under Tweening, you’ll see an easing value. It is by adjusting this value that we can begin to manipulate the spacing of our inbetweens. Here are some example easing values and their effect on the spacing of the inbetweens:
- -100 spaces the drawings very close to the first keyframe and progressively further apart from the second keyframe
- 0 spaces the drawings equally (default)
- +100 spaces the drawings far apart at the first keyframe and progressively closer to the second keyframe
See a visual depiction of this below:
All the easing values on the scale from -100 through +100 space the drawings with varying gravity toward the first or second keyframe, depending on the magnitude of the positive or negative value. Play around with different easing values and see how it affects the spacing of the inbetweens.
Mid tween, you can only adjust the spacing by manipulating these easing values in the properties panel. However, don’t be afraid to add more keyframes mid tween as necessary, especially on the overlapping action parts in order to regain control of the frame. When using tweens, I find that specifying more frames than you would probably call ‘keyframes’ in the key posing stage is a great way to retain as much control of the tweening process as possible.
One final thing to note on tweening in Flash is that the ‘easing’ terminology is actually opposite to the principle of easing that we‘ve talked about previously. The principle of ‘ease out’ (spacing the drawings close to the first key pose and progressively further apart toward the second) is actually represented in Flash by the term ‘ease in’ (i.e. negative ease values). The principle of ‘ease in’ (spacing the drawings far apart from the first key pose and progressively closer together toward the second key pose) is represented in Flash by the term ‘ease out’ (i.e. positive ease values).
Irrespective of the label, knowing and applying the principle of easing is the most important thing. If you‘re using tweens in Flash to do this it can be a bit confusing at first, especially in conversation with colleagues. However, using and talking about the easing values of tweens will soon become intuitive.
SUMMARY
This has been our first official introduction into the world of animating in Flash using symbols and tweens. A symbol allows us to nest images on a secondary timeline within the main timeline. This allows us to reuse body shapes and be as economical as possible with our drawings, essential in a production environment where time is always short.
If we use symbols in Flash, instead of manually inbetweening between keyframes, we can add classic tweens to automatically add inbetweens for us. This is great but often leads to sloppy, weightless animation. Obviously, Flash has no conscious understanding of what good animation looks like! Therefore, you must have a strong understanding of the animation principles to consciously wrestle back control of the animation. In terms of Flash tweens, apply your knowledge of spacing to specify appropriate easing values in the properties panel (negative numbers for easing out of a pose and positive values for easing into a pose.
We’ve covered a lot of ground in this tutorial so I’d highly recommend checking out the resource file to study in greater detail how the symbols are used and what easing values I’ve used on the tweens for each body part throughout the flour sack jump.
In the end, whatever the animation software you use, be it Flash, Toonboom, Maya or any of the myriad other programs out there, all have tools to help speed up your workflow, such as adding automatic inbetweens. However, this isn’t the end of the story. These tools must be tempered with a solid foundation of animation principles in order to wield them successfully.
Never miss out on new tutorials, products or reviews. No spam, we promise.