OVERVIEW
Level: BEGINNER |
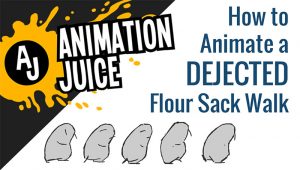
This tutorial will be our first foray into WALKS! With the help of our trusty side-kick the flour sack, we’re going to start looking at how to construct a walk. There is no such thing as a standard walk as the result is dependant on the physicality and emotional state of the character. However there are some commonalities upon which you can begin to construct many different types of walk and this is what we’ll begin to look at in this tutorial.

#008: How To Animate An AWESOME Flour Sack Walk – Resource Files
£3.99BUILDING A WALK
Walk’s come in all shapes and sizes and vary hugely depending on the size and shape of your character and the emotional state they are in. Whilst it’s true to say there is no ‘normal’ walk, there are commonalities between walks that when identified can help us to construct a whole spectrum of walks, depending on the needs of the character.
In this case, we’re going to construct a walk using our friend the flour sack. Again, the flour sack is a great tool to use when learning animation concepts – in this case a functional movement, such as a walk – because it’s simplicity of form and design removes unnecessary complexities that would otherwise obfuscate the important points.
So let’s get started by summarising some of the key concepts covered in the video.
KEY POSES & TIMING
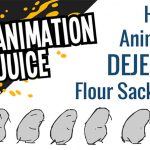
As always, establishing our key poses for the movement is the first step. And thanks to Richard Williams, we’ve been given a set of named key poses which act as our starting point to establish the key poses of our character’s walk. They are as follows: Contact, Down, Passing Position, Up, Contact.
To put this into context, see below for a depiction of these key poses as applied to the flour sack and also note the timing of them (i.e. the frames numbers they feature on)
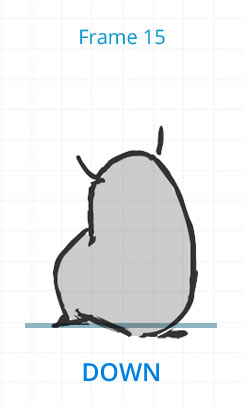
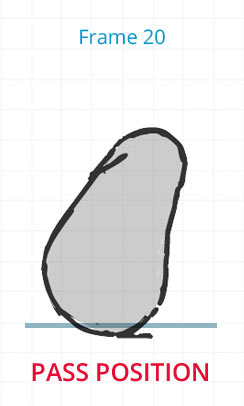
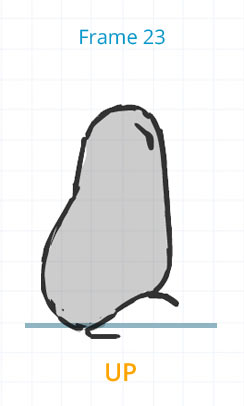
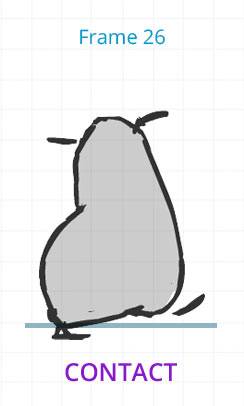
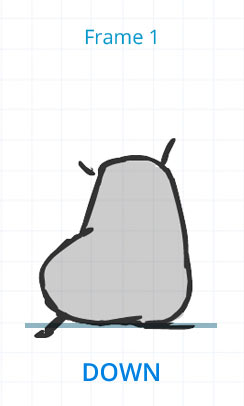
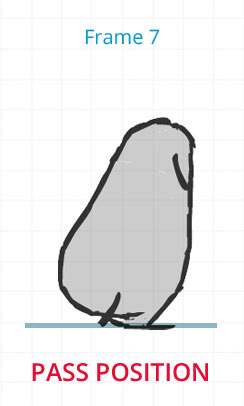
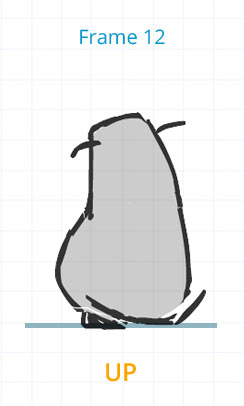
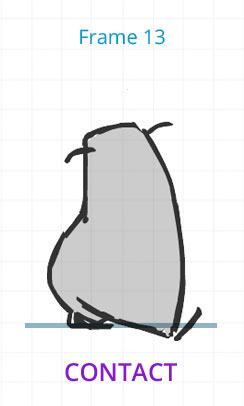
Because the down and up positions can be quite subtle in some case, it’s helpful to draw a base line somewhere near the top of your character through the contact positions. As this is a mid tempo, mid enthusiasm walk, the ups and downs will be quite subtle. Generally, the more enthusiastic a walk, the greater the difference in the up and down position’s which manifests itself as a greater deviance from this baseline. You can see I’ve done this with some guide layers in the resource file.
ADD THE INBETWEENS
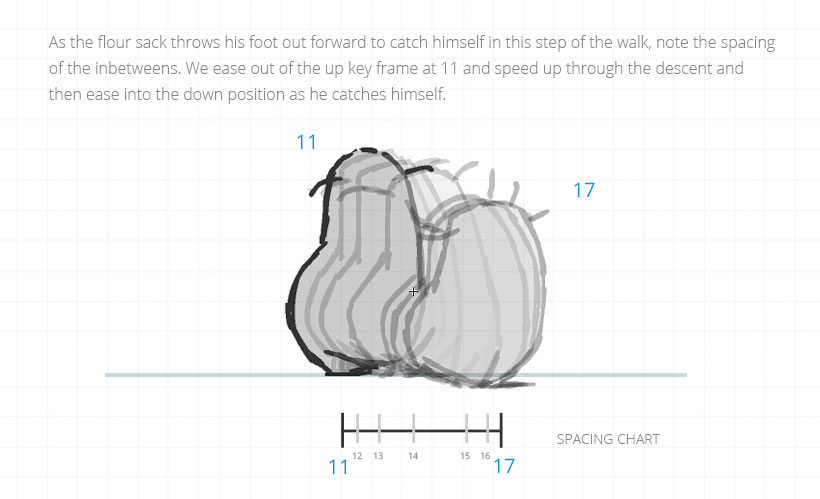
Spending the majority of your time working out your key poses and their timing (as per above) means that inbetweening becomes so much easier. With well thought out key poses and a pleasing timing, the rhythm and attitude of the walk has already been established and nailed down. Therefore, inbetweening becomes simply about joining up the dots. The only thing to be aware of at this stage is the spacing of your inbetweens between each key frame.
Remember, the closer the drawings are spaced, the slower the animation appears to move. The further apart they are spaced the faster the animation appears to be. Using this knowledge, we can create nice easing between our key frames.
FINAL PASS – ARMS
I like to add the arms at the key pose stage just to get an idea of their movement. But it’s not until the final stage that I go back and do a final polish pass on the arms. In this case, because the arms are quite small compared to the main mass, they mostly follow the primary movement of the body.
Because I’ve spent a lot of time getting the main body mass animating as I want it, I like to put my arms on a separate layer and lock all other layers so that I can rub out and tweak with a good deal of accuracy without worry about deleting or rubbing out any of the body work.
I don’t think I can give any tips to speed this process up. I tend to find that it’s just a lot of scrubbing back and forth of the timeline as you feel your way through adding convincing overlap and follow through of the arms. As we’ve done most of the brain intensive work, it’s at this point I’d usually stick the head phones on and power through!
SPECIAL NOTES
TWISTS & T-JUNCTIONS
As mentioned in the tutorial about better key poses, twists are an important part of poses to show dynamism and appeal in your work. I mention in the video above that when drawing our character in 2D, we depict these twists using ‘T-junctions’.
These T-junctions show the relative position of objects in space. That is, what sits behind and what sits in front. As such, using line work alone, we can describe the relationship between connected 3D forms and therefore depict depth. Let me explain:

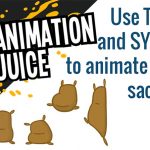
So why is this important for our walk? It’s important because we use it to help describe the relationship between hips and torso and the twisting nature of a body in motion. See below for an example of their use to help show the twisting of the torso and hips of our flour sack:

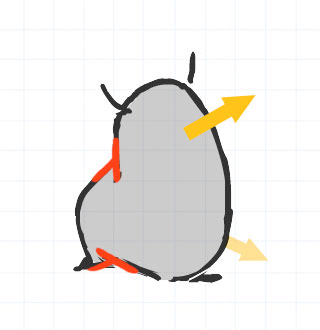
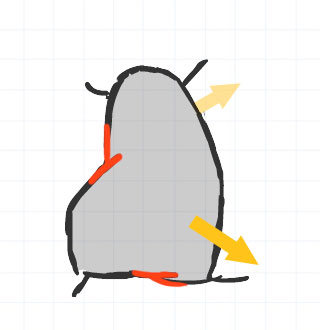
When highlighted like this, it’s no surprise these junctions of line inherit their name from the letter ‘T’ because that’s precisely what they look like! However, whatever you want to call them, it’s most important to use them. Look out for opportunities to better describe the mass of your character using these T-junctions and you will end up with a clearer sense of weight and form in your work.
REVERSE CURVES
Another thing mentioned in the video tutorial is the concept of reverse curves. This will be covered in more detail in a future tutorial however I’d like to touch on it here.
Reverse curves describes the use of opposing curvature of form, usually on successive frames. They create contrast, vitality and appeal because they emphasise the change of shape of the mass.
In our flour sack walk, notice the use of reverse curves as the sack thrusts up out of the down position into the passing position.
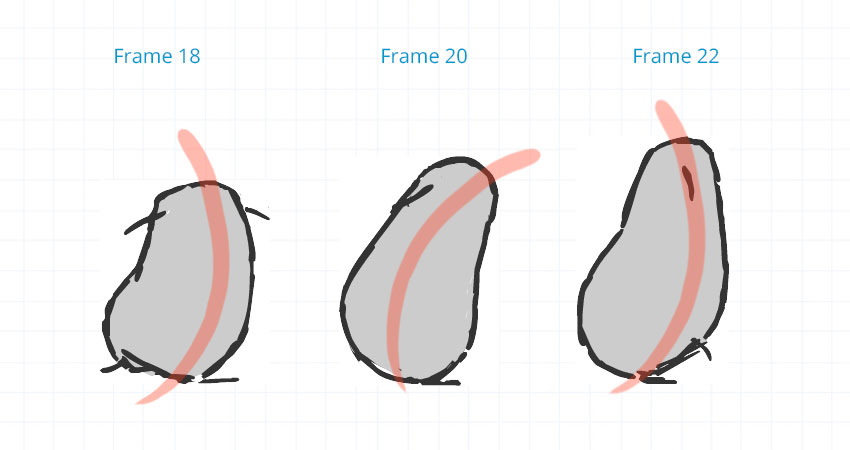
That was quite an overt example but scrub through the resource file timeline to take a look at more subtle examples in the feet and arms. For example, as the leg lifts, the foot drags and then immediately switches to it’s opposite curve (it’s reverse curve) as it moves forward to catch the body weight as it falls to earth again. This is another tool in your toolbox to create better animation.
SUMMARY
Walks at first glance are a little bit complicated so make it easy for yourself by practicing with a character like our flour sack that doesn’t have any extraneous features or complexities of design to detract from the important points. The important points are the key poses used in the construction of a simple walk – contact, down, passing position, up and contact again.
As ever, spend the most time getting these key poses looking great and timed out to create the feeling and rhythm you want. Then it’s a simple case of joining the dots with inbetweens. Don’t just use straight inbetweens though. Remember to think about the spacing of your inbetweens so that you get nice, natural easing between key poses.
As a bonus, if animating in 2D, look out for opportunities to better describe the form of your subject with T junctions. Additionally, look for opportunities to use reverse curves on successive or closely successive frames help to add snap, vitality and appeal to your work. Use of both these techniques will help to life your work to the next level.
If you want more information on the theory of constructing walks, I highly recommend Richard William’s fantastic book: ‘The Animator’s Survival Kit. It features exhaustive discussions on walks and many other functional movements like runs, jumps, sneaks etc. As you forge your career in animation, this book will be your lifetime companion! For more info on it, see our full review of the book.
The Animator's Survival Kit
![]() (91%)
(91%)
This book is packed full of the secrets of the old master animators, which Williams apprenticed under. Beginner to expert, this book is relevant to all life-long students of animation - an essential part of any animators library!
Never miss out on new tutorials, products or reviews. No spam, we promise.